triple tREE bAKES
Recipes, Blog, and Baking Tips, from a MT Girl
Search Results
50 results found with an empty search
- PB Greek Yogurt Dip
This greek yogurt dip is hands down one of my favorite snacks of all time! With only 4 ingredients, plain greek yogurt, peanut butter, vanilla, and honey, it's also so easy to make and tastes amazing. When life calls for a quick and satisfying snack or dessert, this creamy, sweet, and nutty Greek yogurt recipe will hit the spot! With its rich combination of flavors and customizable mix-ins, it’s the perfect balance of indulgence and nutrition. This recipe is not just a treat for your taste buds—it’s also packed with protein. Though the recipe is mine, I have to credit my sister Lindsay for the idea. She has been making a variation of this for years and was the one who introduced my family to it. My kids cannot get enough of this! TO RECIPE PB Greek Yogurt Dip What Makes PB Greek Yogurt Dip a Winner? 1. High Protein Content If you're looking for a delicious way to pack in some extra protein, my PB Greek Yogurt Dip is a game-changer! Each serving delivers 10 grams of protein, making it the perfect snack to keep you fueled and satisfied throughout the day. The creamy Greek yogurt provides a rich, tangy base, while the peanut butter adds a nutty, indulgent flavor—together, they create a balance of taste and nutrition that's hard to beat. Whether you’re dipping fresh apple slices, crunchy celery sticks, or your favorite whole-grain crackers, this protein-packed dip is a simple way to nourish your body while treating your taste buds. It's quick to whip up and a perfect addition to your snack rotation! 2. Versatility This recipe can cater to a variety of dietary needs. Want to reduce sugar? Swap honey for a natural sugar substitute like stevia or erythritol. Prefer a plant-based option? Use almond milk yogurt and almond butter instead! Please note that if you are using different yogurt, you may need a higher nut butter to yogurt ratio for thickness. Optional Mix-Ins This recipe is incredibly versatile, and the mix-ins you choose can take it to the next level. Some delicious options include: Heath toffee bits Add crunch and a buttery sweetness. M&M's: color and sweetness. Semi-sweet chocolate chips: Perfect for a rich chocolatey twist. Fresh fruits: Try bananas, strawberries, or blueberries for a fresh and vibrant flavor. Granola or nuts: Add texture and extra nutrients with chopped almonds, pecans, or granola clusters. Cocoa nibs or shredded coconut: For a gourmet touch! PB Greek Yogurt Dip Mix-In Nutrition Notes Toffee Bits While they add delicious crunch, toffee bits are higher in sugar, so keep portion sizes small if you're watching your sugar intake. Semi-Sweet Chocolate Chips A moderate handful adds antioxidants and a dose of indulgence. Fruits Fresh fruits boost fiber, vitamins, and antioxidants, making this snack even more nutritious. Nuts and Granola These increase fiber, healthy fats, and crunch but can add calories, so sprinkle mindfully. The Yogurt Matters The type of yogurt you use in this recipe matters! First, make sure you use a plain greek yogurt. Second, some brands of yogurt are more runny. The best yogurt to use for this dip is a thick yogurt like Fage or Chobani. If you find your dip is runny then just add 1-2 extra tablespoons of peanut butter! When to Enjoy This Snack This recipe is perfect for: Breakfast Add granola and fresh fruit to turn it into a parfait. Post-Workout The combination of protein and carbs helps replenish energy stores and repair muscles. Dessert With chocolate chips or toffee bits, it becomes a guilt-free dessert. School Lunches My kids don't always eat their whole lunch but, this high protein snack disappears quickly and so does the fruit for dipping! When you make this... Don't forget to tag me on social! I always love hearing from you all and appreciate feedback on my recipes! Thanks for stopping by and don't forget to SUBSCRIBE , where you'll get one exclusive recipe directly into your inbox every month! Enjoy!
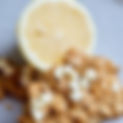
- Lemon White Chocolate Granola
I absolutely love lemon, and this lemon granola has been on my mind for a while! Made with simple, wholesome ingredients—whole rolled oats, honey, fresh lemon zest and juice, cashews, avocado oil, salt, and white chocolate chips—it's a perfect balance of tart and sweet. The bright citrusy lemon pairs beautifully with the rich sweetness of honey, making every bite bursting with flavor! JUMP TO RECIPE Lemon White Chocolate Granola Perfect Granola Cluster Tips Yes there is method to achieving perfect granola clusters and I'm going to share them with you: To stir or not to stir that is the question? I've found that granola creates better clusters when it is baked low and slow and for a longer period of time. This makes it so that the granola really doesn't need to be stirred at all. Stirring is what really breaks those beautiful clusters apart. Don't over bake the granola , just bake it until its starts to turn golden brown. Overbaked granola leads to dry and flaky granola that doesn't stick together. The best granola clusters come from recipes baked at a low temperature for a longer period of time! I bake my granola on a half sheet pan lined with parchment paper . The granola should fill the pan without the parchment peaking through. If that is not the case with certain recipes, use a smaller pan or don't spread the granola out very much, you want it touching. This Lemon White Chocolate Granola recipe fits perfectly onto a half sheet pan sized pan. Lastly, let the granola cool completely before breaking it into clusters. Breaking the granola apart too early doesn't allow the clusters to form so, BE PATIENT! Lemon White Chocolate Granola How to Make Lemon White Chocolate Granola Ingredients 4 cups whole rolled oats 1 cup roasted cashew halves 3 Tbsp lemon zest (zest of 2 lemons) ¼ cup fresh lemon juice ½ cup avocado oil ½ cup honey 1 tsp vanilla extract ¼ tsp salt 1 cup white chocolate chips Instructions Step 1: Preheat & Prepare Ingredients Preheat your oven to 275°F (135°C) and line a large baking sheet with parchment paper. Step 2: Mix the Dry Ingredients In a large mixing bowl, combine whole rolled oats and lemon zest. Stir well to evenly distribute the zest for a bright citrus flavor in every bite. Step 3: Make the Wet Mixture In a separate bowl, whisk together lemon juice, avocado oil, honey, vanilla extract, and salt until fully combined. Step 4: Combine & Coat Pour the wet mixture over the oats and stir until everything is evenly coated. Add the cashews and mix well. Step 5: Bake the Granola Spread the granola mixture evenly onto the prepared baking sheet, making sure it reaches the edges for an even bake. Bake for 55 minutes, stirring halfway through to ensure even toasting. Step 6: Add White Chocolate Once the granola is golden brown, remove it from the oven and immediately sprinkle white chocolate chips over the top. Return to the oven for 2 minutes, just long enough for the chocolate to slightly melt and adhere to the granola. Step 7: Cool & Store Let the granola cool completely before breaking it into clusters. Cooling is key—it helps create those delicious crunchy clumps! Step 8: Enjoy & Store Store your granola in an airtight container at room temperature for up to 2 weeks or freeze it for up to 2 months in a sealed bag or container. Lemon White Chocolate Granola Why Granola Is The Perfect Snack Diverse Granola is an incredibly versatile snack! Start with a simple base recipe of oats, honey, and avocado oil, then customize it however you like. For this recipe, you can swap cashews for macadamia nuts, use coconut oil instead of avocado oil, and add some shaved coconut for a delicious tropical twist. The possibilities are endless! Delicious The flavor of the fresh lemon in contrast to the white chocolate makes this the most delicious snack. Pour over some of your favorite yogurt and add fruit, and you've got the most refreshing and delicious treat! High in Fiber and protein There is 7 grams of fiber and 11 grams of protein in each serving of this delicious granola! So not only is it delicious but it's filling! Did You Make Lemon White Chocolate Granola? Did you make Lemon White Chocolate Granola? I'd love to hear from you! Rate this recipe, leave a comment below, or tag me on social. Thank you for stopping in! Want a free exclusive recipe each month sent right to your inbox? Don't forget to SUBSCRIBE
- S'mores Krispie Treats!
Looking for a quick and delicious no-bake treat? These S'mores Krispie Treats are packed with gooey marshmallows, crunchy cereal, and a drizzle of melted chocolate—perfect for satisfying your sweet tooth! JUMP TO RECIPE S'mores Krispie Treats These no-bake S'mores Cereal Bars are perfect for parties, lunchbox treats, or just indulging at home. With just a few simple ingredients and easy steps, you can enjoy a delicious, chocolatey snack that brings the campfire flavors right to your kitchen! How To Make S'mores Krispie Treats Why You'll Love These No Bake S'mores Krispie Treats Easy Just like S'mores at a campfire, these no bake chocolate treats take only minutes to make. These are perfect for any backyard BBQ, picnic, or party! Eggless With the price of eggs right now, I've seen more and more no bake and eggless recipes. These are absolutely delicious and require no eggs! Fun and Nostalgic Growing up in Montana, S'mores were a dessert staple. I love getting a good fire going cuddling up around the campfire and roasting marshmallows. There is something about those cozy summer nights that have a permanent home in my memories. I was smiling as I created this recipe because these treats are home to me. Few Ingredients These sweet treats come together with only 5 ingredients and most I already had in my pantry! All you need is butter, Malt O Meal S'mores Cereal, a bag of mini marshmallows, and some milk chocolate for drizzling! Easy! Malt O Meal S'mores Cereal S'mores Cereal The above cereal is what I use for this recipe! It's absolutely delicious! It has graham cracker crisps with cocoa puffs and dried marshmallows. Click HERE for the link to buy it on amazon or you can find it locally in Bozeman at Smiths and Rosauers grocery stores. If this option doesn't work for you I suggest buying General Mills Golden Grahams as an alternative. You can also buy containers of dried mini marshmallows in stores to add that crunch, they are also fun to have on hand for hot chocolate! S'mores Krispie Treats How To Make S'mores Krispie Treats Ingredients 1 stick (8 Tbsp) unsalted butter 16 oz bag of mini marshmallows, reserve 1 cup for filling 6 cups Malt O’ Meal S’mores cereal 1/2 cup milk chocolate chips 1 tsp vegetable oil Instructions Melt the Butter and Marshmallows In a large saucepan, melt 1 stick plus 2 tablespoons of butter over low heat. Measure out 1 ½ cups of mini marshmallows and set them aside. Add the remaining marshmallows into the melted butter and stir continuously until smooth and fully melted. Combine with Cereal Place 8 cups of Malt O’ Meal S’mores cereal into a large mixing bowl. Pour the melted marshmallow mixture over the cereal and stir until every piece is well coated. Gently fold in the reserved 1 ½ cups of mini marshmallows for extra gooeyness. Press into Pan Transfer the cereal mixture into a greased or parchment-lined 9x13 inch pan. For easy handling, spray non-stick spray onto your hands or coat them with butter, and firmly press the mixture into an even layer. Melt and Drizzle Chocolate In a microwave-safe bowl, add 1 cup of milk chocolate chips. Microwave on 40% power for about 2 minutes, stirring every 20 seconds until fully melted and smooth. Stir in 1 teaspoon of vegetable oil for a glossy finish. Finish and Serve Drizzle the melted chocolate evenly over the cereal bars. Allow the chocolate to set at room temperature. Once firm, cut into 18 squares and enjoy your homemade S’mores Cereal Bars! S'mores Krispie Treats S'mores Krispie Treats Delicious S’mores Krispie Treats take everything we love about classic Rice Krispie treats and turn up the indulgence with the gooey, melty magic of s’mores. The secret to their irresistible texture lies in the combination of buttery marshmallow, rich melted chocolate, and crunchy graham crackers. The gooey factor comes primarily from the marshmallows, which act as the glue holding everything together. Melting them with a bit of butter ensures a smooth, luscious consistency that coats each cereal piece while staying soft long after they set. The addition of whole or partially melted mini marshmallows folded in at the end adds pockets of stretchy, sticky goodness in every bite—mimicking the perfectly toasted marshmallow center of a campfire s’more. Then there’s the chocolate drizzle on top, creating rich ribbons of flavor throughout. Whether you use classic milk chocolate for that true s’mores taste or go for dark chocolate for a deeper, bittersweet contrast, it’s what makes these treats feel extra indulgent. The graham crackers, whether crumbled throughout or layered on top, provide a hint of crunch and that signature honeyed flavor, tying everything back to the classic fireside dessert. S'mores Krispie Treats Enjoy! I hope you enjoy these S'mores Krispie Treats as much as I do! This recipe was a fun one to create. The nostalgia! If you made this recipe I'd sure appreciate a review! Give me some stars or leave a comment below, I love hearing from you all! Don't forget to SUBSCRIBE for an exclusive recipe each month created by yours truly! Thanks for stopping by!
- Lucky Charms Sugar Cookies
These Lucky Charms Sugar Cookies are magically delicious! You'll love these fun, festive, soft, and chewy cookies, perfect for Saint Patrick's Day! JUMP TO RECIPE Lucky Charms Sugar Cookies Irresistibly Fun Lucky Charms Sugar Cookies These Lucky Charms sugar cookies are trending all over Instagram and Pinterest right now! When I saw them, I felt a rush of nostalgia. Lucky Charms was one of my favorite cereals as a kid. I loved pouring a big bowl and separating the marshmallows from the cereal. Did you ever sort the marshmallows into categories? I did! It was a fun activity. Why You'll Love Lucky Charms Sugar Cookies Magically Delicious: These are cookies that spark childhood dreams. With fun, bright colors and plenty of marshmallows, these cookies are not just pretty—they taste fantastic too! Festive: One look at these cookies, and they scream Saint Patrick's Day! The vibrant green dough and colorful Lucky Charms marshmallows capture the spirit of the holiday. Easy to Make: You can whip these cookies together in less than an hour. Plus, there’s no need to refrigerate the dough! Ingredients for Lucky Charms Sugar Cookies 2 ½ cups all-purpose flour ½ tsp baking powder ½ tsp baking soda ¼ tsp salt ¾ cup (1 ½ sticks) unsalted butter, softened 1 ¼ cups granulated sugar 2 large eggs ½ tbsp vanilla extract 2 cups Lucky Charms marshmallows (reserve ½ cup to decorate) 2 drops of green food coloring (optional) Step-by-Step Guide to Making Lucky Charms Sugar Cookies 1. Prep the Cookie Dough Start by adding ¾ cup of softened butter to a stand mixer with a paddle attachment. Beat the butter until it’s light and fluffy. Add 1 ¼ cups of granulated sugar. Continue beating until the mixture is creamy. This will ensure your cookies have that soft, melt-in-your-mouth texture. 2. Incorporate the Wet Ingredients Crack the eggs into the mixing bowl. Pour in ½ tablespoon of vanilla extract. Mix all ingredients until they are well combined. Your dough should have a smooth, uniform texture. 3. Combine the Dry Ingredients In a separate bowl, whisk together 2 ½ cups of all-purpose flour, ½ teaspoon of baking powder, ½ teaspoon of baking soda, and ¼ teaspoon of salt. This mixture will provide structure to your cookies. 4. Mix Together Gradually add the dry ingredients into the butter-sugar mixture. Use low speed to avoid a flour explosion. Scrape the sides of the bowl to ensure everything is fully incorporated. 5. Add Some Color For a festive, St. Patrick’s Day vibe, add two drops of green food coloring. Mix until the color is fully blended throughout the dough. This step is optional but enhances the fun look of your cookies! 6. Fold in the Marshmallows Gently fold in 1 ½ cups of Lucky Charms marshmallows. Be careful not to break them up too much. These marshmallows add those delightful pops of color and sweetness. 7. Scoop and Shape Use a medium cookie scoop to portion out the dough. Roll each portion into a ball. Place them on a parchment-lined baking sheet, ensuring there's enough space between them for spreading. 8. Top with Extra Marshmallows Top each dough ball with 3–4 additional Lucky Charms marshmallows. This adds a playful and vibrant touch and guarantees every cookie has marshmallows on top! 9. Bake the Cookies Preheat your oven to 350°F (175°C). Bake the cookies for around 11 minutes. Keep an eye on them. They should be slightly golden on the edges but still soft in the middle. 10. Cool and Enjoy Let the cookies sit on the hot baking sheet for 3 minutes. Then, transfer them to a wire rack to cool. Once cooled, indulge in these irresistible Lucky Charms Sugar Cookies! Tips for Perfect Lucky Charms Sugar Cookies Use Room Temperature Butter: Softened butter helps create a smooth dough. Avoid Overmixing: After adding dry ingredients, mix just until combined. This ensures tender cookies. Customize Your Treats: While green food coloring is festive, feel free to use other colors depending on the occasion. Proper Storage: Store cookies in an airtight container for up to 5 days. Keeping them in a cool place can extend their freshness. Note About the Marshmallows It’s great that Lucky Charms Marshmallows Only are now available! It saves a lot of time, eliminating the need to separate marshmallows from the cereal. However, if you have kids at home, give them this fun task as an activity! Did You Try This Recipe? Have you tried this recipe? I would love to hear from you! Leave a comment below or tag me in a post on social media. Also, don't forget to SUBSCRIBE for exclusive monthly recipes, written by yours truly, delivered right to your inbox! Thank you for stopping by! This blog post may contain affiliate links, which means I may earn a small commission if you make a purchase through the links provided, at no additional cost to you. I only recommend products that I believe in. Thank you for supporting this blog—it helps me continue creating content and sharing fun, festive ideas like this one!
- Carrot Cake Oatmeal Muffins: Perfect for a Spring or Easter Brunch
WOW your Spring brunch guests with these Carrot Cake Oatmeal Muffins! With whole rolled oats, freshly grated carrots, orange zest, and protein rich oat milk, these muffins are as nutritious as they are ABSOLUTELY delicious. These are a must try recipe and one that I know you will come back to time and time again! JUMP TO RECIPE Looking for a healthy yet indulgent breakfast? These Carrot Cake Oatmeal Muffins are the perfect balance of nutritious oats, sweet carrots, and fragrant spices. With 8 grams of protein, 5 grams of fiber, 1 cup of carrots, these muffins are also nutrient dense! The combination of whole grain oats and oat milk provides a hearty base, while maple syrup and brown sugar add just the right amount of sweetness. A touch of fresh orange zest and grated carrots makes these muffins incredibly flavorful and moist. Let’s dive into this easy-to-make recipe! Carrot Cake Oatmeal Muffins Carrot Cake Oatmeal Muffins Recipe Ingredients 2 cups whole grain oats 1 ½ cups all-purpose flour ½ cup brown sugar 1 tsp baking powder 1 tsp baking soda ½ tsp salt 2 tsp cinnamon 2 tsp ginger 1 cup finely shredded fresh carrots (about 2 large carrots) 2 Tbsp fresh orange zest (from 1 orange) 1 cup oat milk ½ cup maple syrup ½ cup vegetable oil 2 tsp vanilla extract 2 large eggs ¼ cup sugar in the raw (for topping) Instructions Preheat the Oven: Preheat your oven to 400°F (200°C) . Line a muffin tin with paper muffin liners and lightly spray the top with non-stick cooking spray. Prepare Dry Ingredients: In a large mixing bowl, combine the whole grain oats , all-purpose flour , brown sugar , baking powder , baking soda , salt , cinnamon , and ginger . Stir everything together until well mixed. Prepare Wet Ingredients: In a separate bowl, whisk together the oat milk , maple syrup , vegetable oil , vanilla extract , and eggs until smooth and fully combined. Grate Carrots & Zest Orange: Zest the orange and set aside the zest. Grate the carrots until you have about 1 cup of finely shredded carrots. Set the grated carrots aside as well. Combine Wet and Dry Ingredients: Pour the wet ingredients into the dry ingredients and mix until just combined. Add Carrots & Orange Zest: Gently fold in the carrots and orange zest into the batter. Make sure everything is evenly incorporated. Let Batter Rest:Let the batter sit for 15 minutes . This step is crucial as it helps the oats hydrate, creating a softer texture, and allows the orange zest to infuse the flavor into the batter. Fill Muffin Tins: Using a medium cookie scoop, evenly fill each muffin tin with the batter, ensuring each muffin cup is filled to the top. Use all the batter for a generous portion. Top with Raw Sugar: Sprinkle the sugar in the raw evenly over the top of each muffin. This will give your muffins a slightly crunchy, sweet finish. Bake the Muffins: Place the muffin tin in the preheated oven and bake for 18-20 minutes . Check for doneness by inserting a toothpick into the center of a muffin—if it comes out clean, they are ready! Cool & Serve: Allow the muffins to cool for about 5 minutes in the tin before transferring them to a wire rack to cool completely. Enjoy these Carrot Cake Oatmeal Muffins with a cup of coffee or tea for a delicious breakfast or snack! Carrot Cake Oatmeal Muffins Why You’ll Love These Carrot Cake Oatmeal Muffins These carrot cake oatmeal muffins are packed with whole grains, fiber, and protein. Making them not only delicious and healthy. These muffins are naturally sweetened with maple syrup and brown sugar. The combination of oat milk, carrots, and letting the muffins rest for 15 minutes so the oats can absorb the moisture, gives these muffins the softest texture. A perfect make-ahead snack for busy mornings! You can make these muffins ahead and keep them in the freezer for the perfect easy breakfast. Carrot Cake Oatmeal Muffins Tips For Making Carrot Cake Oatmeal Muffins Let the batter REST! After the batter is made, let it rest f0r 15 minutes. This will allow the oats to absorb the moisture from the carrots and oat milk and lead to a really moist and soft muffin texture. Fill the muffin tin completely! When you are filling the muffin tins with batter fill the paper liners to the top. The muffins will then form the perfect sugar crusted tops! Read through the recipe first. Recipes are meant to be read thoroughly, this recipe will turn out the best if you follow the instructions. Make them more fancy! Try adding cream cheese frosting and Easter sprinkles to these muffin tops instead of raw sugar, making them the most delicious cupcakes! Also, try changing out the cupcake liners to a fun festive design to add a pop of color. Storage For Carrot Cake Oatmeal Muffins These muffins will stay fresh for about 5 days. The best way to store them is in an airtight container . You can also bake these muffins ahead and freeze them. Freezing them in an airtight container will ensure freshness and prevent freezer burn. When you are ready to eat them just pull them from the freezer and let them sit out on the counter in the container. Go the extra mile by warming the carrot muffins on a baking sheet at 300 degrees fahrenheit for 10-15 minutes, this allows the tops to crisp up and gives them that fresh baked taste! Did You Make Carrot Cake Oatmeal Muffins? If you made this recipe I would LOVE to hear from you! Tag me in a post or story on Facebook or Instagram , or find me on Pinterest! Don't forget to leave me a review on this recipe. Have questions about the recipe? Leave them in the comments below. Before you go, don't forget to check out other similar recipes you will love below! Triple Tree Bakes is a participant in the Amazon Services LLC Associates Program, an affiliate advertising program designed to provide a means for sites to earn advertising fees by advertising and linking to Amazon.com . As an Amazon Associate, I earn from qualifying purchases.
- Cadbury Mini Egg Peanut Butter Blossoms: A Festive Fun Easter Treat
These cute Cadbury Mini Egg Peanut Butter Blossoms are the ultimate treat to bring to your Easter or Spring celebrations. With a soft, peanut buttery base, crisp granulated sugar coating, and delicious nest of Cadbury eggs on top, these cookies are as fun to make as they are to eat! Whether you’re sharing them at a family gathering or keeping them all to yourself, they are sure to become a classic tradition every spring. JUMP TO RECIPE Cadbury Mini Egg Peanut Butter Blossoms I have always loved peanut butter blossoms. There is something about chocolate and peanut butter that does it for me! I love adding these cookies into all of my favorite holidays. Changing out the sanding sugar color, or changing out the candy on top, is an easy way to make these fun and festive for any time of year. "I have tried a lot of peanut butter blossoms but yours are the best!" Kelsey Hattel Cadbury Mini Egg Peanut Butter Blossom Tips For those of you who have not had the delight of tasting a traditional peanut butter blossom, they are a simple chewy peanut butter cookies with a delicious Hershey's kiss on top. For my Easter take on these, I swapped the kiss for mini cadbury eggs. Resulting in the cutest bird nests! Eating them when they are fresh or still warm is a must! The melted milk chocolate eggs and the rich peanut butter are a match made in heaven. A few things that are important about this recipe is that the dough should be refrigerated for at least 2-4 hours before forming it into balls and rolling it in sugar. This helps them maintain their shape. Second, I always use Jif or an off brand of CREAMY premixed peanut butter. Though I am a fan of organic peanut butter in my regular diet, it does not work well with this recipe, as the fats are not as evenly distributed throughout causing the cookies to be more dry. Last, the mini eggs need to be pressed into the top of the cookies when they are FRESH from the oven. If you bake the cookies with the eggs already on, the chocolate can burn! Mini Cadbury Egg Peanut Butter Blossoms Why You'll Love These Cookies Colorful and Festive: Adding the mini eggs on top makes these cookies look like birds nests! Don't be afraid to also use yellow, pink, or light blue sanding sugar instead for granulated, for an extra pop of Spring color. Family Fun: These cookies are a wonderful activity to enjoy with kids. They’ll love helping roll the dough in sugar and press the mini eggs into the warm cookies. Then of course, they will LOVE eating them! Classic Flavor Combination: The creamy peanut butter and milk chocolate create a timeless pairing that’s always a crowd-pleaser. Cadbury Mini Egg Peanut Butter Blossoms Recipe Ingredients 1 3/4 cups all-purpose flour 1 tsp baking soda 1/2 tsp salt 3/4 cup Jif creamy peanut butter 1/2 cup soft unsalted butter 1/2 cup brown sugar 1/2 cup granulated sugar 1 egg 2 Tbsp half and half 1 tsp pure vanilla extract 60 Mini Cadbury Eggs 1/2 cup granulated sugar for rolling the dough into (or sprinkles of your choice) Instructions Prepare the Dough: In a medium bowl, cream together the peanut butter and soft butter until smooth. Add in the brown sugar and granulated sugar, creaming until fluffy. Mix in the egg, half and half, and vanilla extract. Combine Dry Ingredients: In a separate bowl, whisk together the flour, baking soda, and salt. Gradually add the dry ingredients to the wet mixture, stirring until just combined. Cover the dough and refrigerate for 2-4 hours. Shape and Coat: Use a medium cookie scoop or tablespoon to portion out the dough. Roll each piece into a ball. Place the red and blue sugar into separate bowls. Roll 12 of the dough balls in red sugar and 12 in blue sugar. Leave the remaining dough uncoated for a classic look, if desired. Bake: Preheat your oven to 350°F (175°C). Arrange the dough balls on a baking sheet lined with parchment paper, spacing them about 2 inches apart. Bake for 8-9 minutes, or until the edges are set but the centers are still soft. Add the Mini Cadbury Eggs: Remove the cookies from the oven and immediately press 3 Cadbury Eggs into the center of each cookie. The warm cookies will slightly melt the chocolate, helping them adhere. Cool and Enjoy: Allow the cookies to cool on the baking sheet for 5 minutes before transferring them to a wire rack to cool. Enjoy! Mini Cadbury Egg Peanut Butter Blossoms Can You Freeze Cadbury Mini Egg Peanut Butter Blossoms? Yes, this cookie dough is great for prepping ahead! You can freeze the batch of dough in a container or double wrapped in seran. Just let it thaw overnight in the refrigerator before rolling the balls and baking. Or, you can roll the cookie dough into balls and then freeze them. If you are going to try this method I would freeze the dough balls on a cookie sheet 1 inch apart so they don't stick together. Once frozen you can transfer them to a gallon zip lock bag or airtight container. When you’re ready to bake them, let the frozen cookie dough balls sit at room temperature for an hour or so. You may need to add an extra minute onto the bake time if they are still cold. You can also freeze peanut butter blossoms after they are baked. I recommend letting them cool completely, then store them in an airtight container with parchment between the layers to prevent sticking. This will also keep them from getting freezer burnt. You can store them for up to three months. When you are ready to eat them its best to let them thaw in the container at room temperature. Did you make Cadbury Mini Egg Peanut Butter Blossoms? If you made these delicious treats, I want to hear from you! Follow me on Instagram or Facebook , tag me in a story or post, or please take a minute to leave me a recipe comment or review! Before you go make sure to SUBSCRIBE and you'll receive one exclusive recipe a month straight into your inbox. Bake a batch (or two) for Easter or this spring season, and watch them disappear! I made these two days ago and they are already gone, my family loves these cookies and I know you will too! Be sure to check out related recipes below! Triple Tree Bakes is a participant in the Amazon Services LLC Associates Program, an affiliate advertising program designed to provide a means for sites to earn advertising fees by advertising and linking to Amazon.com . As an Amazon Associate, I earn from qualifying purchases.
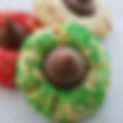
- Holiday Peanut Butter Blossoms
These Festive Peanut Butter Blossoms are the ultimate treat to bring a little extra magic to your celebrations. With their soft, peanut buttery base, sparkling sugar coating, and a classic Hershey’s kiss nestled on top, these cookies are as fun to make as they are to eat. Whether you’re sharing them at a family gathering or enjoying them by the fireplace with a cup of hot cocoa, they’re sure to become a holiday tradition. JUMP TO RECIPE Holiday Peanut Butter Blossoms I have always loved peanut butter blossoms. There is something about chocolate and peanut butter that does it for me! I also love incorporating these cookies into all of my favorite holidays. Changing the sanding sugar is an easy way to make these work for any time of year. "I have tried a lot of peanut butter blossoms but yours are the best!" Kelsey Hattel Holiday Peanut Butter Blossom Tips For those of you who have not had the delight of tasting a peanut butter blossom, they are a simple chewy peanut butter cookies with a delicious Hershey's kiss on top. Eating them when they are fresh or still warm is a must! The melted kiss and the rich peanut butter are a match made in heaven. A few things that are important about this recipe is that the dough should be refrigerated for at least 2-4 hours before forming it into balls and rolling it in sugar. This helps them maintain their shape. Second, I always use Jif or an off brand of CREAMY peanut butter. Though I am a fan of organic peanut butter in my regular diet, it does not work well with this recipe. Last, the kisses need to be pressed into the top of the cookies when they are fresh from the oven. If you bake the cookies with the kisses already on, the chocolate can burn! Holiday Peanut Butter Blossoms Why We Love These Cookies Colorful and Festive: Rolling the cookies in red and blue sugar adds a vibrant touch, making them perfect for holiday parties or even patriotic celebrations throughout the year. Family Fun: These cookies are a wonderful activity to enjoy with kids. They’ll love helping roll the dough in sprinkles and pressing the Hershey’s kisses into the warm cookies. Classic Flavor Combination: The creamy peanut butter and milk chocolate create a timeless pairing that’s always a crowd-pleaser. Holiday Peanut Butter Blossoms Ingredients 1 3/4 cups all-purpose flour 1 tsp baking soda 1/2 tsp salt 3/4 cup creamy peanut butter 1/2 cup soft unsalted butter 1/2 cup brown sugar 1/2 cup granulated sugar 1 egg 2 Tbsp half and half 1 tsp pure vanilla extract 24 Hershey’s kisses, unwrapped Red and blue dusting sugar (or sprinkles of your choice) Instructions Prepare the Dough: In a medium bowl, cream together the peanut butter and soft butter until smooth. Add in the brown sugar and granulated sugar, creaming until fluffy. Mix in the egg, half and half, and vanilla extract. Combine Dry Ingredients: In a separate bowl, whisk together the flour, baking soda, and salt. Gradually add the dry ingredients to the wet mixture, stirring until just combined. Cover the dough and refrigerate for 2-4 hours. Shape and Coat: Use a medium cookie scoop or tablespoon to portion out the dough. Roll each piece into a ball. Place the red and blue sugar into separate bowls. Roll 12 of the dough balls in red sugar and 12 in blue sugar. Leave the remaining dough uncoated for a classic look, if desired. Bake: Preheat your oven to 350°F (175°C). Arrange the dough balls on a baking sheet lined with parchment paper, spacing them about 2 inches apart. Bake for 8-9 minutes, or until the edges are set but the centers are still soft. Add the Kisses: Remove the cookies from the oven and immediately press an unwrapped Hershey’s kiss into the center of each cookie. The warm cookies will slightly melt the chocolate, helping it adhere. Cool and Enjoy: Allow the cookies to cool on the baking sheet for 5 minutes before transferring them to a wire rack to cool completely. Serve and savor the holiday cheer! Pro Tips Chill the Dough: Don’t skip the refrigeration step! Chilling the dough ensures the cookies hold their shape and don’t spread too much during baking. Experiment with Colors: While red and blue are festive, you can customize the sugar colors to suit any occasion—green and red for Christmas, pastels for spring, or even gold for New Year’s Eve. Store Smart: Keep these cookies in an airtight container at room temperature for up to 5 days. They also freeze beautifully for longer storage. These Festive Peanut Butter Blossoms are the perfect combination of nostalgia and fun, bringing smiles to faces young and old. Bake a batch (or two) this holiday season, and watch them disappear faster than you can say “Happy Holidays!” I made these two days ago and they are already gone, my family loves these cookies and I know you will too! Holiday Peanut Butter Blossoms Did you make Holiday Peanut Butter Blossoms? If you made these delicious treats, I want to hear from you! Follow me on Instagram or Facebook , tag me in a story or post, or please take a minute to leave me a recipe comment or review! Before you go make sure to SUBSCRIBE and you'll receive one exclusive recipe a month straight into your inbox. Check out related recipes below!
- Easy Easter Rice Krispies Treats
Celebrate Easter with a delightful, colorful twist on a classic treat! These Easter Rice Krispies Treats are dipped in creamy white chocolate and topped with fun pastel sprinkles, perfect for any spring celebration. Easy to make and so delicious, this recipe is perfect for a holiday dessert, family gatherings, or gifting to friends. Here’s how you can create these festive treats with just a few simple ingredients. JUMP TO RECIPE Easy Easter Rice Krispies Treats Why You’ll Love This Easter Rice Krispies Treats Recipe There are so many reasons to LOVE this fun and festive Easter Rice Krispies Treats recipe! First, it’s incredibly easy to make, so even if you're not a seasoned baker, you can create these adorable treats in no time. Next, the pastel sprinkles and cute spring-themed cookie cutter shapes make them perfect for Easter parties, family gatherings, or even as a special gift for loved ones. Plus, they’re a hit with both kids and adults—everyone loves a good Rice Krispies treat, especially one that's dressed up for the occasion! Lastly, these treats are also versatile—feel free to get creative with your decorations. Whether you’re piping on cute bunny faces or adding extra sprinkles, you can make each treat unique. And the best part? They can be made in advance and stored for a few days, so you don’t have to worry about last-minute prep. Easy Easter Rice Krispies Treats Easter Rice Krispies Treats with White Chocolate and Pastel Sprinkles Recipe Ingredients 7 cups Rice Krispies Cereal 10 oz bag Jet Puffed Mini Marshmallows 6 Tbsp salted butter 2 tsp vanilla extract 12 oz bag white chocolate chips 1 cup semi-sweet chocolate chips 1 Tbsp coconut oil or vegetable oil Your favorite Easter-themed sprinkles Spring-shaped cookie cutters Instructions: Prepare the Marshmallow Mixture: In a large saucepan or Dutch oven , melt 6 tablespoons of salted butter over medium/low heat. Add ¾ of the 16 oz bag of mini marshmallows, stirring constantly until fully melted and smooth. Combine with Rice Krispies: In a large mixing bowl, pour in 7 cups of Rice Krispies cereal. Pour the melted marshmallow mixture over the cereal and stir until well combined. Add the remaining ¼ of marshmallows to the mixture and mix them in for added texture. Set the Mixture: Transfer the mixture onto a parchment-lined baking sheet and press it down evenly to form a uniform layer. Let it set for about 5 minutes. Cut the Shapes: Lightly spray the bottom of your favorite spring-shaped cookie cutters with non-stick spray. Carefully cut out shapes from the Rice Krispies mixture, pressing the cutters as close together as possible to maximize the number of cutouts. Melt the White Chocolate: In a microwave-safe bowl, add the entire bag of white chocolate chips. Microwave at 40% power for about 3 minutes, stirring every 20 seconds. Once melted, stir in 1 tablespoon of coconut or vegetable oil to make the chocolate smoother and easier to work with. Dip the Rice Krispies Treats: Pour your favorite Easter sprinkles into separate bowls. Dip the top half of each Rice Krispies shape into the melted white chocolate, shaking off any excess. Immediately press the dipped portion into the sprinkles, allowing them to stick. Let the chocolate set. Decorate with Semi-Sweet Chocolate: In a plastic pastry bag, add 1 cup of semi-sweet chocolate chips. Microwave at 40% power for about 2 minutes, checking every 20 seconds to massage the bag and ensure the chocolate melts completely. Once melted, cut the tip of the bag to create a narrow opening for piping. Pipe Decorations: Pipe cute bunny faces or decorative patterns onto the dipped Rice Krispies shapes. Get creative with your designs! Let Set and Enjoy: Allow the chocolate decorations to set fully before serving. For the best experience, store the treats in an airtight container in the refrigerator for up to 5 days. Be sure to take them out 10-15 minutes before eating, so they soften slightly and are easier to enjoy. Easy Easter Rice Krispies Treats Tips To Making Easy Easter Rice Krispies Treats Use non stick spray! Make sure to use non stick spray on the bottoms of the cookie cutters for a clean cut edge. Cut a narrow tip on your piping bag. Make sure to cut the tip on the piping bag fine when you go to pipe the semi-sweet chocolate. Let the chocolate set. Make sure to let the white and semi-sweet chocolate set fully before storing in an airtight container. Store in the refrigerator. Store in the refrigerator for lasting freshness! Why You Must Try These Easter Rice Krispie Treats These Easter Rice Krispies Treats are the perfect combination of simplicity, fun, and flavor. With their gooey marshmallow center, crispy texture, and festive white chocolate coating, they’re sure to be a crowd-pleaser at any Easter celebration. The pastel sprinkles add the perfect touch of color, making these treats not just delicious, but visually stunning as well. Whether you're making them for a family gathering, a party, or as a special treat for loved ones, they’re sure to bring joy to anyone who enjoys a sweet, nostalgic snack. The best part? They’re customizable, allowing you to get creative with your decorations and shapes. From bunny faces to egg patterns, the possibilities are endless. And since you can make them ahead of time, they’re a convenient dessert option that won't take up your entire day. So why not bring a little extra cheer to your Easter celebrations this year with these delicious, easy-to-make Rice Krispies treats? Enjoy and happy baking or no baking :)! Easy Easter Rice Krispies Treats Enjoy Easter Rice Krispies Treats? If you made these delicious treats, I want to hear from you! Follow me on Instagram or Facebook , tag me in a story or post, or please take a minute to leave me a recipe comment or review! Before you go make sure to SUBSCRIBE and you'll receive one exclusive recipe a month straight into your inbox. Check out related recipes below!
- Easy Guinness Chocolate Cake with Irish Cream Buttercream Frosting
Saint Patrick's Day has always been one of my favorite holidays! The traditions, the vibrant green, and the playful leprechaun mischief all make it so much fun. Last year, I created this Guinness Chocolate Cake recipe, and it was an instant hit, so I’m excited to share it with you! The cake is a rich, moist blend of chocolate and Guinness Stout, topped with a smooth, Irish Cream buttercream frosting. It’s the perfect treat to impress your family and friends this St. Patrick’s Day! JUMP TO RECIPE Guinness Chocolate Cake Why Guinness Chocolate Cake Will Become A ST. Patrick's Day favorite Colorful and festive: Have fun with the Saint Patricks Day theme, pipe a pot of gold, have fun creating with rainbow sprinkles, or add no color and just pipe the top with some Irish buttercream rosettes! Chocolate, Guinness, and Irish Cream: My husband's birthday is March 19th so I made this for him last year and it was a hit. You cannot go wrong with the magic trio of chocolate, Guinness, and Irish Cream. Delicious: This cake is so moist and has the perfect balance of adult beverage to chocolate ratio :) Guinness Chocolate Cake Ingredients for Guinness Chocolate Cake 2 sticks unsalted butter, melted 1 cup Guinness beer ¾ cup cocoa powder 2 large eggs ¾ cup buttermilk 1 Tbsp vanilla extract 2 cups all-purpose flour ¾ cup granulated sugar ½ cup brown sugar 1 ½ tsp baking soda ½ tsp salt Ingredients for Irish Cream Buttercream 3 oz Irish Cream whiskey 2 sticks unsalted butter, softened 4 cups powdered sugar Green food coloring Rainbow sprinkles (optional, for decoration) Instructions Step 1: Prep the Oven and Cake Base Preheat the oven to 350°F (175°C). Grease a 9x13-inch baking pan with butter or non-stick spray. In a saucepan, melt 2 sticks of butter over medium heat. Once melted, add 1 cup of Guinness beer and bring it to a simmer. Let it cook for 2 minutes, then remove it from heat. Stir in ¾ cup of cocoa powder until smooth. Set this mixture aside to cool slightly. Step 2: Mix the Dry Ingredients In a medium-sized bowl, whisk together 2 cups of flour, 1 ½ tsp baking soda, and ½ tsp salt. Set aside. Step 3: Prepare the Wet Ingredients In a large mixing bowl, whisk together 2 eggs, ¾ cup granulated sugar, ½ cup brown sugar, and ¾ cup buttermilk until smooth and well combined. Add 1 Tbsp of vanilla extract and mix. Step 4: Combine Wet and Dry Mixtures Gradually pour the warm Guinness and cocoa mixture into the buttermilk mixture, stirring gently until just combined. Add the dry ingredients to the wet mixture in batches, stirring until incorporated. Be careful not to overmix; a few small lumps are perfectly fine. Overmixing could cause the cake to sink or become dense. Step 5: Bake the Cake Pour the batter into the prepared 9x13 pan and smooth the top. Bake for 25-30 minutes, or until a toothpick inserted in the center comes out clean, or when a digital thermometer reads about 200°F (93°C). Allow the cake to cool completely in the pan. Step 6: Make the Irish Cream Buttercream In a stand mixer or large bowl, beat 2 sticks of softened butter using the whisk attachment until light and fluffy. Gradually add 4 cups of powdered sugar, 1 cup at a time, mixing well between each addition. Pour in 3 oz of Irish Cream whiskey and beat until the frosting is smooth and fluffy. Set aside ¼ cup of frosting for piping. Step 7: Decorate the Cake Spread the remaining buttercream evenly over the cooled cake using a spatula. To the reserved frosting, add 3 drops of green food coloring and mix well. Transfer to a piping bag. Pipe festive designs, like shamrocks or other St. Patrick’s Day shapes, on top of the cake. For a fun touch, top with rainbow sprinkles. Guinness Chocolate Cake Tips For Baking Guinness Chocolate Cake 1. Use a Good Quality Guinness : The quality of the stout you use can affect the flavor of your cake. Use a good quality Guinness (or another stout beer), as it adds depth to the chocolate flavor and keeps the cake moist. 2. Don't Skip the Stout Reduction : Boiling the Guinness with butter before adding it to the batter helps to concentrate the flavors and make the cake extra moist. Make sure to allow the Guinness-butter mixture to cool slightly before mixing it with the other ingredients. 3. Use Room Temperature Ingredients : Ensure that your butter, eggs, and sour cream (if using) are at room temperature. This helps everything combine smoothly for a better texture. 4. Don't Overmix the Batter : When adding the dry ingredients to the wet ones, mix just until combined. Overmixing can lead to a dense, tough cake. 5. Grease and Flour the Pan Well : To avoid sticking, grease and flour your cake pan (or use parchment paper), especially when using a bundt or springform pan. You can also use cocoa powder to dust the pan after greasing to avoid any flour residue showing on the cake. 6. Let the Cake Cool : Allow the cake to cool completely in the pan for about 20-30 minutes before transferring it to a wire rack. This will help the cake set and prevent it from breaking apart. Did You Try This Recipe? Tried this recipe? I would love to hear from you! Leave me a comment below or tag me in a post on social. Also, don't forget to SUBSCRIBE for an exclusive monthly recipe, written by yours truly, delivered right into your inbox! Thank you for stopping by! This blog post may contain affiliate links, which means I may earn a small commission if you make a purchase through the links provided, at no additional cost to you. I only recommend products that I genuinely love and believe will be helpful to you. Thank you for supporting this blog—it helps me continue to create content and share fun, festive ideas like this one!
- Leprechaun Bait: A Sweet and Festive Treat for St. Patrick's Day!
St. Patrick’s Day is just around the corner, and what better way to celebrate than with a fun, colorful, and delicious treat? Introducing Leprechaun Bait —a sweet, salty, and crunchy snack mix that is guaranteed to be a hit at your St. Patrick's Day festivities. Packed with all the things you love—pretzels, cereals, candy, and sprinkles—this easy-to-make treat is perfect for anyone looking to add a little extra magic to their holiday. JUMP TO RECIPE Leprechaun Bate Why Leprechaun Bait Will Become A ST. Patrick's Day Tradition Easy: This takes less than 30 minutes to make! Colorful: This treat is geared towards kids because of the bright rainbow colors and it's fun sweet flavor! Leprechaun Bait: We actually put some of this in my kids leprechaun traps every year and the kids think it's also the leprechauns favorite snack! Delicious: This stuff is addicting! it really does taste so good and has such a satisfying crunch. Leprechaun Bate Ingredients 2 cups of Snyder's pretzel twists The perfect balance of salty crunch to add a savory twist to the sweet mix. 3 cups of Corn Chex Cereal : These crispy, light pieces provide an airy texture and absorb the delicious coating. 1 cup of M&M’s : A classic addition that adds a pop of color and chocolatey sweetness. 2 cups of Lucky Charms cereal : Filled with whimsical charms and flavors, this cereal is synonymous with St. Patrick’s Day magic! 2 cups of Lucky Charms marshmallows : The soft, colorful marshmallows elevate the fun factor while giving this treat a sweet touch. ¼ cup sprinkles : Rainbow-colored sprinkles to top it all off with even more festive charm. 16 oz vanilla candy coating : A rich, creamy coating that binds everything together in sweet, glossy perfection. Instructions Mix the Dry Ingredients: Start by gathering a large bowl and adding the pretzels, Corn Chex cereal, M&M’s, Lucky Charms cereal, and Lucky Charms marshmallows. Mix everything together, making sure each ingredient is evenly spread. Melt the Candy Coating In a glass Pyrex dish, melt the vanilla candy coating. Microwave it at 40% power for 6 minutes, stirring every minute to ensure it melts smoothly and evenly. The coating should become silky and ready to pour over your mix. Coat the Snack Mix Once the candy coating has melted to a smooth consistency, pour it generously over the dry mix. Stir gently to make sure every piece is coated in the sweet, creamy glaze. Sprinkle with Festive Color Now for the fun part—sprinkles! Add a generous amount of rainbow sprinkles to the top of the snack mix. The sprinkles will add an extra festive touch to your Leprechaun Bait. Set and Enjoy Spread the coated mix onto a sheet pan lined with parchment paper and let the chocolate set. Once the candy coating has hardened, you’re ready to dig in and enjoy! Leprechaun Bate Why You'll Love Leprechaun Bait A Fun Twist on Snack Mix : This treat combines your favorite cereals, salty snacks, and sweets in one delicious mix. Salty and sweet is a win win in my book! Perfect for Any St. Patrick’s Day Celebration : Whether you're hosting a party, having a family gathering, or just want a festive snack, Leprechaun Bait is sure to be a crowd-pleaser. Everytime I make this its gone in no time! Easy to Make : This is a no bake treat! With just a few simple ingredients and minimal prep time, this treat comes together in less than 30 minutes. Customizable : Feel free to add in your favorite treats or adjust the ingredients to your liking. You can even swap out M&M’s for another candy or add some chocolate chips for extra richness! I play with this recipe every year and even cater it to what I have on hand. A Little Leprechaun Magic in Every Bite So, what are you waiting for? Gather your ingredients, unleash your inner leprechaun, and make this your new St. Pattys Day tradition. Happy St. Patrick’s Day! Did You Try This Recipe? Tried this recipe? I would love to hear from you! Leave me a comment below or tag me in a post on social. Also, don't forget to SUBSCRIBE for an exclusive monthly recipe, written by yours truly, delivered right into your inbox! Thank you for stopping by! This blog post may contain affiliate links, which means I may earn a small commission if you make a purchase through the links provided, at no additional cost to you. I only recommend products that I genuinely love and believe will be helpful to you. Thank you for supporting this blog—it helps me continue to create content and share fun, festive ideas like this one!
- Snickerdoodle Bars with Cream Cheese Frosting
If you love the warm, comforting flavor of snickerdoodles, you're going to adore these Snickerdoodle Bars with Cream Cheese Frosting! Imagine the classic cinnamon-sugar goodness of snickerdoodles, but in bar form with a velvety cream cheese frosting that takes everything over the top. These bars are soft, chewy, and bursting with cinnamon flavor, and the tangy cream cheese frosting adds the perfect creamy finish.Perfect for fall baking, potlucks, or just an afternoon treat, these bars are an irresistible twist on the beloved snickerdoodle cookie. So grab your mixing bowl and get ready to bake your new favorite dessert! TO RECIPE Snickerdoodle Bars With Cream Cheese Frosting Perfect for fall baking, potlucks, or just an afternoon treat, these bars are an irresistible twist on the beloved snickerdoodle cookie. So grab your mixing bowl and get ready to bake your new favorite dessert! If you love the warm, comforting flavor of snickerdoodles, you're going to adore these Snickerdoodle Bars with Cream Cheese Frosting ! Imagine the classic cinnamon-sugar goodness of snickerdoodles, but in bar form with a velvety cream cheese frosting that takes everything over the top. These bars are soft, chewy, and bursting with cinnamon flavor, and the tangy cream cheese frosting adds the perfect creamy finish. Why You'll Love These Snickerdoodle Bars With Cream Cheese Frosting There’s something about the cinnamon-sugar crunch and the soft, chewy texture of snickerdoodle cookies that makes them irresistible. But when you turn those flavors into bars and top them with a rich, cinnamon-infused cream cheese frosting? Well, you’ve just taken snickerdoodles to a whole new level. These bars are: Chewy & Soft : Just like traditional snickerdoodles, but easier to make in bar form. Cinnamon-Sugar Perfection : The cinnamon-sugar topping gives these bars a crisp, sweet finish that’s simply divine. Creamy Frosting : The cinnamon cream cheese frosting is smooth, tangy, and the perfect complement to the cinnamon spice in the bars. Trust me, these Snickerdoodle Bars will become your go-to dessert for all occasions! Snicker Doodle Bars With Cream Cheese Frosting Snickerdoodle Bars with Cream Cheese Frosting Ingredients For the Snickerdoodle Bars: 1 cup unsalted butter, softened 1 2/3 cups granulated sugar 2 large eggs 1 Tbsp vanilla extract 3 cups all-purpose flour 1 tsp baking soda 1 tsp salt 1 1/2 tsp cream of tartar For the Cinnamon-Sugar Topping: 1/3 cup granulated sugar 1 Tbsp ground cinnamon For the Cinnamon Cream Cheese Frosting: 2 oz cream cheese, softened 1/4 cup unsalted butter, softened 1 tsp vanilla extract 2 cups powdered sugar 1/2 tsp ground cinnamon 2 Tbsp half-and-half (or milk) Instructions 1. Prepare the Oven & Pan Preheat your oven to 350°F (175°C). Grease a 9x13-inch baking pan or line it with parchment paper for easy removal later. 2. Mix the Snickerdoodle Bar Batter In a large bowl, cream together the butter and granulated sugar using an electric mixer or stand mixer until the mixture is light and fluffy. This should take about 2-3 minutes. Add in the eggs and vanilla extract and mix until fully combined. In a separate bowl, whisk together the all-purpose flour, baking soda, salt, and cream of tartar. Gradually add the dry ingredients to the wet ingredients, mixing until just combined. The dough will be thick and a bit sticky—this is perfect! 3. Prepare the Cinnamon-Sugar Topping In a small bowl, combine the granulated sugar and cinnamon for the topping. Stir until well combined. 4. Spread the Dough in the Pan Press the snickerdoodle dough evenly into the prepared 9x13-inch pan. The dough will be a little thick, so use your hands or a spatula to smooth it into an even layer. Sprinkle the cinnamon-sugar mixture evenly over the top of the dough, ensuring that it covers the surface. 5. Bake the Snickerdoodle Bars Bake for 25-30 minutes, or until the edges are golden brown and a toothpick inserted into the center comes out clean or with just a few moist crumbs. Depending on your oven, the baking time might vary, so check the bars around the 25-minute mark. Once baked, allow the bars to cool in the pan for about 15 minutes, then transfer to a wire rack to cool completely before frosting. 6. Make the Cinnamon Cream Cheese Frosting While the bars are cooling, it’s time to make the frosting. In a large bowl, beat the cream cheese and butter together until smooth and creamy. Add the vanilla extract, powdered sugar, and ground cinnamon. Beat until the frosting is fluffy and smooth. Gradually add the half-and-half to achieve a spreadable consistency. If you want a thicker frosting, feel free to add more powdered sugar, but this amount should give you a nice, creamy texture. 7. Frost the Bars Once the bars have cooled completely, spread the cinnamon cream cheese frosting evenly over the top using a spatula or butter knife. Be generous—this frosting is the perfect complement to the warm, cinnamon flavor in the bars. I like to add the frosting to a piping bag and pipe it onto the bars to make them look extra special. They look really pretty when you pipe the frosting into a pattern allowing some of the cinnamon and sugar topping to show through. 8. Slice & Serve Slice the bars into squares or rectangles and serve! These bars are perfect for parties, family gatherings, or just enjoying with a cup of coffee or tea. Snickerdoodle Bars With Cream Cheese Frosting Tips for Perfect Snickerdoodle Bars Don’t Overmix : When you’re combining the wet and dry ingredients, mix just until combined. Overmixing can lead to dense, tough bars. Cool the Bars Completely : Allow the bars to cool completely before frosting. If they’re still warm, the frosting might melt and slide off. Adjust Frosting Consistency : If you prefer a thicker frosting, add more powdered sugar. For a thinner, lighter frosting, add a little more half-and-half. Use Room Temperature Ingredients : Make sure your butter and cream cheese are softened to room temperature before making the frosting. This will help them blend together smoothly. Why You Need to Make These Snickerdoodle Bars These Snickerdoodle Bars with Cream Cheese Frosting are everything you love about snickerdoodle cookies, but with the added bonus of a creamy, cinnamon-spiced frosting that will leave everyone wanting more. The bars are soft, chewy, and bursting with flavor, while the frosting brings a tangy sweetness that perfectly balances the cinnamon-sugar topping. Whether you’re baking for the holidays, a weekend treat, or just because you want something sweet, these snickerdoodle bars are the perfect dessert to satisfy your cravings. They’re easy to make, crowd-pleasing, and full of cozy, comforting flavors. Enjoy these Snickerdoodle Bars with a cup of hot coffee or a glass of milk for the ultimate dessert experience! Bonus Idea : If you want to make these bars even more indulgent, try adding a sprinkle of chopped nuts, like pecans or walnuts, into the batter. Or, for a festive twist, add a dash of nutmeg to the cream cheese frosting! Happy baking, and enjoy every sweet bite of these Snickerdoodle Bars!
- No Bake Protein Pretzel Bites
A new year calls for fresh goals, and for many of us, that means finding snacks that balance health, convenience, and taste. I love a sweet treat as much as the rest of us but have been craving more balance in the new year! If you’re looking for something easy to make,no bake, packed with protein, and just indulgent enough to keep your cravings in check, say hello to Protein Pretzel Bites! No Bake Protein Pretzel Bites combine the salty crunch of pretzels, the wholesome goodness of oats, and the protein-packed benefits of peanut butter and vanilla protein powder. Topped off with a chocolate drizzle, they’re the perfect snack to power your January days—whether you’re tackling work, the gym, or a cozy afternoon at home. TO RECIPE No Bake Protein Pretzel Bites Why You’ll Love No Bake Protein Pretzel Bites: No Baking Required Quick and easy to whip up, these bites are perfect for those busy days. High in Protein With the addition of your favorite protein powder, each bite helps keep you full and energized. Customizable Swap the peanut butter for almond or sunflower seed butter, or use dark chocolate chips for an even richer flavor. No Bake Protein Pretzel Bites Ingredients For No Bake Protein Pretzel Bites: 1 cup chopped pretzel pieces 2 cups whole rolled oats 1 heaping cup creamy peanut butter ½ cup your favorite vanilla protein powder (we love Orgain plant-based vanilla!) ½ cup honey 1 tsp vanilla extract For the Chocolate Drizzle: ½ cup semi-sweet chocolate chips 1 tsp vegetable oil or melted coconut oil No Bake Protein Pretzel Bites No Bake Protein Pretzel Bites Instructions Step 1: Combine All Ingredients In a medium-sized bowl, combine all the pretzel bite ingredients: 1 cup chopped pretzels, 2 cups oats, 1 heaping cup peanut butter, ½ cup protein powder, ½ cup honey, and 1 tsp vanilla extract. Mix until fully combined. Step 2: Roll Into Balls Using a medium cookie scoop, roll the mixture into balls and place them on a cookie sheet lined with wax paper or parchment paper. Refrigerate for 10-15 minutes to firm up. Step 3: Melt Chocolate Melt ½ cup semi-sweet chocolate chips in a microwave-safe dish at 40% power for 40 seconds to 1 minute. Stir every 20 seconds until smooth. Add 1 tsp of vegetable oil or melted coconut oil to the melted chocolate and stir completely. Step 4: Drizzle Remove the pretzel bites from the refrigerator and drizzle the chocolate evenly over the top. Place back in the refrigerator for another 5 minutes until the chocolate sets. Step 5: Storage Enjoy immediately or store in an airtight container in the fridge for up to a week. What's Not to Love About Protein Pretzel Bites What’s not to love about No Bake Protein Pretzel Bites? They’re the perfect blend of sweet, salty, and satisfying—all wrapped up in a bite-sized, protein-packed treat. Whether you need a quick energy boost, a post-workout snack, or a little something to curb your sweet tooth, these bites check all the boxes. The combination of crunchy pretzel pieces, hearty oats, and creamy peanut butter creates a chewy, slightly crispy texture, while the drizzle of rich chocolate adds just the right amount of indulgence. Not only are No Bake Protein Pretzel Bites incredibly delicious, but they’re also easy to make with just a handful of wholesome ingredients. The vanilla protein powder gives them an extra boost of protein, making them a great alternative to store-bought protein bars. Plus, the honey and peanut butter work together to bind everything into a perfectly poppable snack. A quick chill in the fridge helps them set, making them easy to grab and go. The best part? The chocolate drizzle. A simple mix of semi-sweet chocolate and a touch of oil melts into a smooth, glossy finish that elevates these bites from everyday snack to irresistible treat. Once set, they’re ready to enjoy anytime—whether it’s with your morning coffee, as an afternoon pick-me-up, or even as a healthier dessert. With a recipe this simple and delicious, these Protein Pretzel Bites are bound to become a staple in your snack lineup! What Brand Of Protein Should I Use For No Bake Protein Pretzel Bites? The fantastic thing about this No Bake Protein Pretzel Bite recipe is that you can use any protein powder that you have on hand. However, this recipe is made using a vanilla protein powder and I think it tastes best. Chocolate protein powder would also be a great choice! My favorite protein powder is Orgain Organic Plant Based Vanilla . It's not gritty, it comes from a plant source, and it tastes great, it works very well for this recipe! Perfect for Any Occasion These No Bake Protein Pretzel Bites are as versatile as they are delicious. Pack them in your lunchbox for a midday energy boost, bring them to your next workout session as a post-gym snack, or keep a batch in your fridge for those moments when your sweet tooth kicks in. A Healthier Start to the Year If you try this recipe, I'd love to hear from you! Share your photos and variations with me on social media, and don’t forget to tag me @TripleTreeBakes. Here’s to a happy, healthy, and snack-filled January! Before you go, don't forget to SUBSCRIBE to receive an exclusive recipe each month!